A Step-by-Step Guide to Building Powerful Presentations
Building a PowerPage
Create a New PowerPage
A PowerPage is your central hub, where you curate your facts to craft an impactful presentation.
To create a PowerPage, selct + New on the top left corner of the dashboard. This will open a blank PowerPage ready for your content.

Saving Your PowerPage to a Folder
Give Your PowerPage a folder to store in.
Select + New Folder to the right of the home button. Assign a folder to your PowerPage.

If no folders exist, create a new folder by selecting + Create new folder
Give your new folder a title.
Define Your Objective
Your objective defines what you want to accomplish.
Select the text next to the subject to type your objective. Briefly explain your presentation's purpose in the objective field

Craft a Clear Recommendation
Your recommendation is the proposed call to action which you want your team to adopt.
Enter your desired outcome or recommendation in the Enter Recommendation line.

Build Your Supporting Argument for the Recommendation: Reasons and Evidence
Your reasons are the "why" behind your recommendation.
Select + Reason to add the reason supporting your recommendation. Type a concise yet comprehensive overview of each reason.

Your evidence are the key points that support each reason.
Select + Evidence under each reason to add supporting evidence. Briefly summarize the evidence in the provided box.

Unveil the Details
Your evidence detail provide the data to back your evidence summary.
Select the arrow on the evidence box to delve deeper. Use + Evidence detail to expand on the evidence summary.

Attach documents, images, or links to solidify your points.
Drag and drop files or select Upload more files to add attachments.
Simply paste links in the Enter evidence detail – content text to include relevant webpages.
Exploring Views and Sharing
Presentation Views
SparkHub offers various presentation views including:
Top View (Default): Shows the overall structure of your PowerPage.
Collapsed View: Condenses the view for a streamlined overview.
Horizontal View: Provides a horizontal layout for a broader perspective.
Evidence Summary View: Shows all reasons down to the level of evidence summaries.
Evidence Detail View: Shows all reasons down to the level of evidence details.
To navigate between views, use the collapsed view function on the top left corner. You may then select your desired view from the dropdown menu.

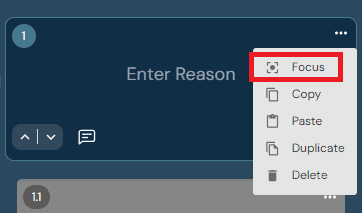
To focus on a specific reason and its vertical, select the three dots on the top right corner of the reason box and select Focus.
Sharing Your PowerPage
Sharing allows team members to access and edit your PowerPage.
Select the second box from the top right corner of your Powerpage. Copy the link to share with your team or directly type email addresses for sharing then click Share to grant access and editing permissions for team members.

Presenation Modes
Presenation Mode
Presentation mode allows to display a clean version of your PowerPage.
Select the picture button at the top right corner to launch a clean presentation view.

Editing Mode
Editing mode allows you to edit all points of your PowerPage.
Return to editing mode by clicking the pencil button in the same location.

Customization and Collaboration
Tailoring Organization Layers
Customizing layers allows you to rename the pre-set organizational titles (Subject, Recommendation, Reason, Evidence) to match your presentation's specific focus. Simply click on the title and edit the text.

Collaboration Features
SparkHub allows team members to comment and vote so that all stakeholder's voices are heard.
Commenting: Click the quotation mark icon on each box to leave comments.

Voting: Express your opinion by clicking the up or down arrows on each box.

Drag and Drop Editing
Drag and Drop allows you to interchange reasons and evidence.
Move evidence details to any relevant section. Click the number button on each box's top left corner to reorder.
Delete Function
Delete allows you to eliminate any reason or evidence box.
Click the three dots and select Delete to remove any box. Deleting a reason removes all supporting evidence, and deleting an evidence summary removes all its details.